This article was originally published on programmingliftoff.com as Build a Twilio App to get COVID-19 Case Counts.
In this tutorial you'll learn how to build a Twilio app that sends users the latest COVID-19 statistics for their state or country. I made a video for this tutorial. You can watch it or scroll down for the written tutorial!
Here's a Demo of What We'll Build
Create a Free Twilio Account
In this tutorial we'll use a free Twilio trial account. If you sign up with my referral link (twilio.com/referral/upSwBH) you get a $10 Twilio credit when/if you upgrade your trial account to a paid account. You can also sign up without my referral link at twilio.com/try-twilio.
Get a Phone Number from Twilio
To get a phone number, head to twilio.com/console/phone-numbers/search. There you can search for a number by digits in the number, or by the location (area code) of the number. Once you click Search, some numbers will be listed. Find one you like and click Buy. There is a $1 monthly fee, but it's covered by the free credits you got when you created your account.
Create a Twilio Studio Flow
Find the Twilio Studio option in the left sidebar, or visit twilio.com/console/studio/dashboard. Then click Create a flow. Enter a name for the flow, for example 'COVID data'. Choose Start from scratch on the template selection screen. At this point you should be shown a blank studio flow.
In the Widget Library on the right, scroll down to the Messaging section and click-and-drag Send Message onto the canvas. The widget options should be shown on the right. Enter 'SendReply' for the widget name, and enter 'Hello, Twilio!' for the message body, then click Save. Next, drag the dot from the Incoming Message trigger to the 'SendReply' widget. Finally, click Publish in the top right to publish the Studio flow. You've created your first Studio flow!

Run the Studio Flow when a Text is Received
Now that you've created a flow, it's time to test it. Head to twilio.com/console/phone-numbers/incoming to view the phone number you purchased earlier. Go ahead and send you number a text message. You can send anything you want, such as 'Test'. You should get a preconfigured reply from Twilio. We want our Studio flow to run and send a customized reply when we text it, so we'll set that up now.
Click on your phone number (on the twilio.com/console/phone-numbers/incoming page). Then scroll to the bottom. In the Messaging section, choose Studio Flow in the A message comes in dropdown. Then on the right, choose the name of the Studio flow you just created. Finally, click Save at the bottom. Now this flow will run whenever your number receives a text message!

Note that 'Sent from your Twilio trial account - ' will be added to the beginning of every message. You can only remove this by adding your credit card to your account, which you can do by clicking the blue 'Upgrade Project' button near the top of the page. It's not necessary to upgrade for this tutorial as long as you don't mind that trial text in the messages.
Create a Twilio Serverless Function
At this point we've setup our Twilio app to send a reply whenever we text it. That's great, but it's always the same reply, which isn't very useful. Remember, our goal is to send the user the latest COVID statistics for whatever state or country they send. To do that, we'll need to run some code that retrieves the COVID data when a text is received. Let's get started creating that function!
Tip: Click the pin icon next to the name of the Twilio service in the left sidebar to make it easier to access.

First use the left sidebar nav to open the Twilio functions section. Click the Create a Function button. Choose the JSON Response template and click Create.
Choose a function name, such as 'Get COVID data'. Enter a path for the function, such as '/covid'. Check the Access Control box to check for a valid Twilio signature when the function is called.
Twilio serverless functions are just like a Google Cloud or AWS serverless function. Anyone can call the function if they know its URL. By checking the Access Control box, you're saying that you only want the function to run if it was called by another Twilio service (in our case that will be the Studio flow). It's smart to lock cloud resources down like this to help prevent abuse.
Leave the Event blank. We'll setup the trigger event in the Studio flow. Finally, change the response object to be: let response = { message: event.location };. Then click Save to save the function.

The
eventparameter is passed to the function by the Studio Flow. We haven't added the function to the Studio Flow yet, but we'll see how to do that shortly.
Add the Twilio Function to the Studio Flow
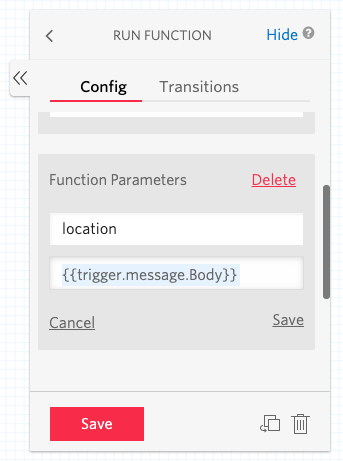
Alright, now that we've created a function, let's add it to the Studio flow. Open up the 'COVID data' Studio flow. Then, in the Widget Library on the right, scroll down to the Tools & Execute Code section and click-and-drag Run Function onto the canvas. Then click on that function widget to see the widget options on the right. Update the name to 'GetCOVIDdata' and select the 'Get COVID data' function in the Function URL dropdown. Also click the + next to Function Parameters and add location as the key and {{trigger.message.Body}} as the value, then click Save.

The function parameters are added to the
eventobject that we saw earlier in the function definition. We set the value equal to a template string, which is the body of the incoming text message.
Next update the Incoming Message trigger to call the function rather than the 'SendReply' widget (drag the end of the end of the Incoming Message arrow from 'SendReply' to the function). Then drag the dot from the function Success state to the 'SendReply' function. Finally, click on the 'SendReply' widget and change the message body from 'Hello, Twilio!' to {{widgets.GetCOVIDdata.parsed.message}} and click Save to save that change to the widget.
{{widgets.GetCOVIDdata.parsed.message}}is a template string.widgets.GetCOVIDdata.parsedreturns a JSON object with the response from the 'GetCOVIDdata' function. Since we updated the function response to{ message: event.location }, the template string will be replaced with the location parameter, which is the body of the text message that the user sent. That means that currently this will echo the users text message back to them!
Click Publish in the top right to publish the changes to the Studio flow. It should now look similar to the image below:

Now that we've created our serverless function and added it to the Studio flow, let's test to make sure it's working. If you send a text to your Twilio number, you should now get a reply with the same message you sent. If so, you're ready to tackle the last challenge in this tutorial, updating the function to fetch and return the COVID data for the location texted to it.
Completing the COVID Data Function
You can update the Twilio function with the contents of the following code snippet and I will explain what it does below.
const axios = require('axios');

const states = [
  'alabama', 'alaska', 'arizona', 'arkansas', 'california', 'colorado', 'connecticut', 'delaware',
  'district of columbia', 'florida', 'georgia', 'guam', 'hawaii', 'idaho', 'illinois', 'indiana',
  'iowa', 'kansas', 'kentucky', 'louisiana', 'maine', 'maryland', 'massachusetts', 'michigan',
  'minnesota', 'mississippi', 'missouri', 'montana', 'nebraska', 'nevada', 'new hampshire',
  'new jersey', 'new mexico', 'new york', 'north carolina', 'north dakota',
  'northern mariana islands', 'ohio', 'oklahoma', 'oregon', 'pennsylvania', 'puerto rico',
  'rhode island', 'south carolina', 'south dakota', 'tennessee', 'texas', 'utah', 'vermont',
  'virginia', 'washington', 'west virginia', 'wisconsin', 'wyoming'
];

exports.handler = async function (context, event, callback) {
  const response = {};
  const location = event.location.trim();
  const states_or_countries = states.includes(location.toLowerCase()) ? 'states' : 'countries';
  try {
    const res = await axios.get(`https://corona.lmao.ninja/v2/${states_or_countries}/${location}`);
    const { cases, deaths } = res.data;
    response.message = `There have been ${Number(cases).toLocaleString()} cases and ` +
                       `${Number(deaths).toLocaleString()} deaths in ${location}.`;
  } catch {
    response.message = `Error retrieving data for ${location}. Please send either a state or country.`;
  }

  callback(null, response);
};
One important thing to note is that we've made the handler function async. This is because we use await for the api call. We get the location from the event param as we did before, this time adding trim() to remove any whitespace. Next we check if the location is in the states array. If it is we make a request to the /states/<location> API route. If not we assume it's a country and make a request to the /countries/<location> API route.
Docs for the COVID-19 API we're using can be found here corona.lmao.ninja/docs.
If the API request is successful we get the cases and deaths from the response data object and use it to construct a message to return via the callback function. If there is an error we update the message with a generic error message and pass that to the callback. Be sure to Save the function!
Since the Studio Flow already sends the message as the reply we don't need to update that, however there is one more update we need to make before the function will work. You may have noticed we imported axios at the top of the function. axios isn't accessible to the function by default, but we can add that node module. With the Functions option open, click Configure in the left sidebar and scroll down to the Dependencies section. Click the red/white + button and in the new line that is added, enter axios as the name and 0.19.2 (currently the latest version) as the version. Click Save and your function will be re-deployed with that dependency!

You did it!
If you've made it this far, you've successfully created a text message service with Twilio that replies with the latest COVID-19 data for the location sent by the user. Great job! It's really neat how you can create a text message service like this relatively easily with Twilio Studio and Twilio Functions. These tools do take some time to learn and get comfortable with, but once you know how to use them you've got some really powerful tools at your disposal.
